Recently in DIY Category

After having brewed beer for a few years, I recently went from bottling to kegging.

My reason was defeat. Too many of my batches have turned into gushers when bottled. I once discovered that one batch had become infected when I was about to bottle it, so I assumed that the other gushers had been infected, too. Although, I wasn't entirely certain, because when I managed to vent and pour a gusher, the telltale sourness of an infected beer was absent. The gushing appeared by be caused by the thin layer of sediment in the bottle being whirled up by a few bubbles, becoming a nucleous for additional CO2 bubbles and making the beer gush through the bottle neck. This would indicate over-carbonation but for this to be true, apparently the difference between almost flat and over-carbonated beer seemed to be about five to ten grams of sugar for an entire batch, and I found that unlikely.

It also seemed unlikely that boiling sugar dissolved in water for ten minutes, cooling it down, and pouring it into the beer would cause an infection. I had ruled out hygiene problems related to the bottles because I've always cleaned and disinfected the bottles thoroughly, and it was either the same kind of gushing in all 60 to 90 bottles, or nothing at all. (In case you wonder, I also paid proper attention to sterile equipment in all other steps of the bottling process.)

I finally became convinced that infection at bottling time was hardly the reason when my first lambic style beer also became a gusher. It had been sitting in its carboy for a year and a half when I primed it with sugar and new yeast then transferred it bottles. Two weeks later, they were all gushers; not violent ones, but enough to whirl the sediment into the beer and having to rush the beer into a glass. I vented and re-capped them all, and it seems I may be lucky this time. But certainly the gushing could hardly be caused by an infection considering that the beer was deliberately "infected" to begin with and everything edible had long since been digested by the bacteria.

My current hypothesis is that it was probably beer brewed with highly or moderately flocculating yeast that stayed in the bottles; low-flocculation yeast might not settle well enough on the smooth bottom of the bottles, causing just enough of it to be drawn into the beer to start the chain reaction that I'd observed earlier.

Rather than sticking (excuse the pun) to highly flocculent yeast, I figured that since kegged beer is tapped from the bottom of the keg, then even if there's sediment in the keg that provides nucleation particles for the bubbles, it will be flushed out of the keg. Hence, if my hypothesis is correct, my gushing problems should be eliminated by kegging the beer.

Fjerde Rytter

“Fjerde Rytter,” Danish for “Fourth Horse­man,” is the pale rider who brings death: an appro­priate name for an aggres­sively hopped IPA.

Maybe my hy­po­thes­is is correct, or maybe it is be­gin­n­er­'s luck, but my first kegged beer seems to be perfect. The first two glasses tapped from the keg were a muddy mush of sed­i­ment, and I was ser­i­ously worried about my beer at first, but by the third glass the beer had cleared per­fectly, and it tastes won­der­ful with a perfect head and not a speck of im­pur­ity in sub­sequent ser­v­ings.

There's lots of in­form­a­tion about force-car­bon­at­ing your beer online and from what I can tell, most of the con­fu­sion and mis­takes are caused by rather fun­da­ment­al mis­un­der­stand­ing - like not real­iz­ing you should be sitting in your car seat before turning the ig­n­i­tion.

I nonetheless decided to purchase a complete set containing all the necessary parts: a brand new keg, hoses, a regulator, a CO2 canister, and all the necessary fittings. This way I knew I wouldn't be missing anything. Knowing what is needed for a keg, I would know what fittings to order the next time together with a used keg.

So far I've learned two minor things that I didn't see mentioned in any instructions.

Firstly, the set-and-forget force carbonation method means I identify the required pressure on a pressure chart and set the regulator accordingly; it is about as easy as it gets. The keg immediately reaches this pressure, but instead of “forgetting,” turn off the gas. Then half a day later as some the CO2 is absorbed into the beer, causing the pressure in the little room above the beer to fall, turn the gas back on for a moment to restore the pressure. This needs only being repeated about daily for the first week, then hardly at all after that. The advantage is that you won't lose CO2 if there happens to be a small leak somewhere between the CO2 inlet and the CO2 canister.

Secondly, don't attach the CO2 to the beer outlet as some suggest. Granted, the CO2 will be absorbed somewhat faster into the beer if it is allowed to bubble up through the beer, but my bet is you'll gain a few hours over an entire week at most. Meanwhile, if you don't maintain CO2 pressure, you'll risk beer pushing back into the CO2 hose and possibly into the regulator.

Both of the above approaches will reduce the carbonation speed slightly, but if you're serious about speed, probably your best bet is to avoid the set-and-forget method. I'm sufficiently patient to waiting just a few more days. Well, sort of: I couldn't help sampling, of course.

Perhaps I've learned another few things: this particular beer had been sitting in the fermentation bucket for about a month and had stopped fermenting altogether two weeks earlier. It wouldn't have hurt to let it mature a little more, however, so in the future I'll rack my beer to the kegs and have it sit there for another two weeks before applying carbonation. Also, the next beer to be kegged appears to be spiced somewhat too lightly. In contrast to bottled beer, the keg allows me to throw in a little more spice and restore the pressure.
Smoke Detector Just Got Hotter

| No Comments

When my wife and I bought our new home after having lived in apartments and thus making other people rich, some of the first electronic equipment was a few smoke detectors. They were inexpensive, visually mostly unobtrusive, deafeningly loud, alerting each other via radio contact for cross-estate warning, and battery driven.

Well, I said it: battery driven. Battery driven smoke detectors turn into a false sense of security within half a year, because once the batteries run out, you soon learn to forget to change them—especially in the smoke detectors that were purchased which require three double-A batteries and one 9-volt battery. Besides, were it not for the shelf life of batteries versus gold bars, batteries are so expensive that some countries might consider backing their economies with double-A's rather than gold. So eventually we took down the smoke detectors, probably against any recommendations our insurance company might otherwise have given us.

But then who needs batteries? We have wall outlets in every room, and what is the risk that mains power breaks down during a fire before the smoke detectors manage to warn us? Certainly this risk is smaller than having to remember to change the batteries, perhaps unless you suffer from OCD.

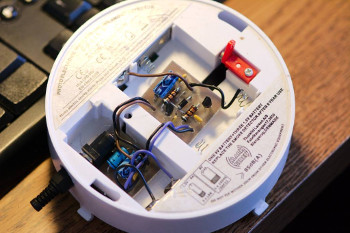
Smoke Detector with Power SupplyHence, the solu­tion was simple: any elec­tron­ics tinker­er­ worth his salt can whip to­geth­er­ a power supply, or in the case of our smoke de­tect­or, a dual power supply provid­ing 4.5 Volts (cor­res­pond­ing to three double-A bat­ter­ies) and 9 Volts. A generic 12 Volt wall wart pur­chased in­ex­pen­s­ively over Ebay, coupled with a 78L09 for 9 Volts, fol­lowed by a 78L05 and a diode for 4.3 Volts (which is close enough to 4.5 Volts), a few st­a­b­il­iz­a­tion ca­pa­cit­ors, and that was it: solder the output of the voltage reg­u­lat­ors to the battery con­nect­ors, and our smoke de­tect­or would never ask for another battery. The dual power supply could probably be crammed into a single battery compartment, but I happened to have a two small pieces of PCB that I had saved. I hate to throw stuff away.
I was just about to install the improved smoke detector when I realized that smoke detectors are no good if you're away from your house. We already have a network of Zigbee devices scattered throughout our garden for measuring our greenhouse environment, the weather, and radiation level. The Zigbee devices report to a Linux server that is permanently turned on, so it only seemed natural to include a Zigbee radio in the smoke detector so that our server could pick up any warnings and act accordingly (that is, by sending a text message to my wife telling her that the dinner I'm preparing is getting ready).

The "XBee" Zigbee module from Digi is capable of detecting pin changes and sending a pin change notification to another XBee module without any additional electronics. Surely the electronics in the smoke detector would include a signal that indicated the detection of smoke, so it was just a question of locating it, preferably before going deaf while the alarm was sounding.

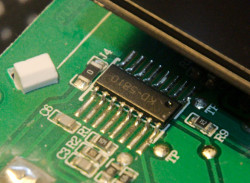
Smoke Detector's KD-8510 MicrocontrollerFor­tu­n­ately, an obscure German dis­cus­sion re­vealed that the on-board mi­cro­con­trol­ler­ was an oth­er­wise non-descript KD-5810 half-hidden beneath a metal cover, and someone with little elec­tron­ics ex­per­i­ence seemed to have con­cluded that pin 7 on the pro­ces­sor went high when the de­tect­or was trig­ger­ed. Right indeed; this—and an ad­di­tion­al 3.3 V power supply and a voltage divider to safely feed the 9 V signal on pin 7 to the XBee module—was all I needed. The smoke detector now sits happily on the ceiling in our kitchen, and its companions will be mounted as soon as I have constructed power supplies for them as well. It will not be necessary to put Zigbee radios in the remaining smoke detectors, assuming they will are capable of maintaining their native radio contact with each other.
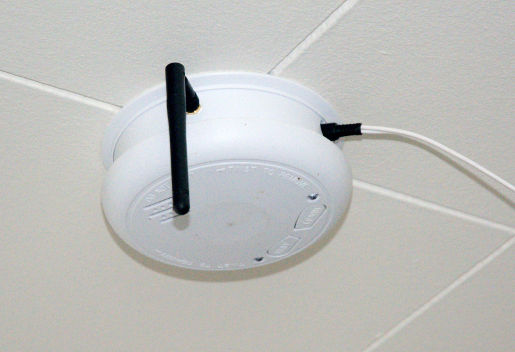
Improved Smoke Detector MountedYes, I know: it is not too pretty yet. The wire should be hidden beneath (well, above) a wire cover, and the antenna should be white. But it works for now.
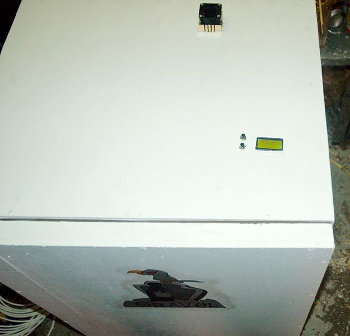
I have two spare Spark Cores and I briefly considered using one of those instead. However, I have already built a Zigbee infrastructure, and since I also needed more Zigbee routers to keep the network up, Zigbee became the obvious choice.

Beer Fermentation Climate Box

| No Comments
My thirst for beer and my thirst for knowledge seem to be converging these months: I'm gaining interest in brewing beer that I don't even particularly like but nonetheless feel compelled to try to brew because it poses a technical challenge. Recently this manifested itself as a desire to brew a lager which requires equipment that I didn't have at the moment.

Beer brewing climate box from the outside.

Lagers ferment at rather low tem­per­at­ures and home brewers gen­er­ally solve the problem by con­ver­t­ing an elec­tric fridge to main­tain stable tem­per­at­ures slightly above their in­ten­ded op­er­at­ing range. Some brewers im­ple­ment this con­ver­sion some­what crudely with a control that turns on and off the mains supply for the fridge; others replace the entire control cir­cuitry with a PID con­trol­ler­ of their own.
I was somewhat concerned about the energy consumption of yet another fridge in our home, however, and decided to ally with the cold climate of Scandinavia instead. I realized that the temperature in our unheated garage is largely the same as the outside temperature, and the average fall or spring temperatures are perfect for lager fermentation.
The original lagers were carried into the limestone caves of southern Germany where the temperature remains constant through the changing seasons. My garage is no limestone cave, though, and the temperature certainly isn't constant. This poses an immediate problem because beer requires a correct, constant temperature, not a correct, average temperature. Yeast requires a rather stable temperature for its own health reasons, and it produces different byproducts at different temperatures, rendering the quality of the final beer about as unpredictable as the notoriously volatile Danish weather. Placing the fermentation bucket in the garage during the Danish fall or spring might yield a genuine and decent lager but the result would be neither predictable nor repeatable.
Besides, fridges cool their contents but they don't heat them. The fridge would certainly be capable of keeping the temperature down while the outside was too hot, but the beer would be at the mercy of the elements once the outside temperature dropped below the target. Finally, I'm told that fridges and freezers are manufactured for optimum performance at indoor temperatures. It would seem that a fridge would be happy in cool or cold surroundings but its efficiency would actually drop if moved outside of kitchen temperature surroundings.
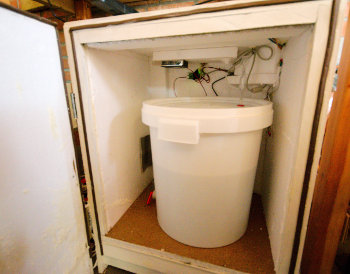
Beer brewing climate box, inside view.
I decided to take a di­f­fer­ent route and con­struct a climate box from scratch. It was not in­ten­ded to heat or cool its con­tents but simply main­tain a stable tem­per­at­ure over a few days of varying outside tem­per­at­ures. In other words, a climate box.
Th­ink­ing about it, maybe my real mo­t­iv­a­tion is that the IT bus­i­ness is en­tirely un­in­ter­es­ted in elec­tron­ics degrees (and, indeed, in any skill beyond entry-level and hence low salary .NET skills, it seems) which in turn is woe­fully under-stim­u­lated and hence drives me to use my hard-earned un­i­ver­s­ity degree for hobby pro­jects instead. At least someone be­ne­fits from my efforts this way; I still regret having been in­volved in sur­veil­lance pro­jects tapping into phones in the Middle East.
I constructed the box entirely out of pieces of scrap wood that had been left over after other home projects and was waiting only for my wife or myself to make the next trip to the recycling center. I covered the inside of it with polystyrene and added a wooden floor for the fermentation bucket to stand on. The wooden construction would certainly have been easier with wood that simply needed to be cut into shape rather than being glued together to form sides, but at least this way it was free.
Lauter tun made from a food cooler box.
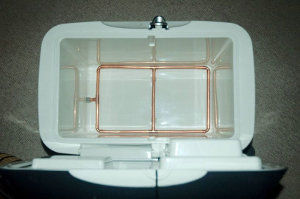
I then pur­chased an in­ex­pen­s­ive 12 V food cooling box in an auto­mob­ile parts store where it was on sale now that summer was over. I im­me­di­ately took it apart to salvage the cooler which I knew was a Peltier element. (I turned the box itself into a lauter tun that I have little use for, but that's beyond the scope of this article.)
For heating, I had a spare ceramic heater otherwise intended for our reptilian pets. I suppose I could have build some reversible fan mechanisms and valves to allow the Peltier element to be used for both heating and cooling, but I decided to focus on keeping the climate box insulated.
All that remained was a controller, which again i managed to construct entirely out of components that I already had in my electronics lab. The heart of the controller is an Arduino with a custom shield containing a temperature probe and drivers for the Peltier element and the 230 V ceramic heater.
The Arduino uses separate PID controllers for the cooler and the heater. I decided to leave a grant zone where PID controllers would be turned off to curb their opposed interests somewhat. PID controllers, as we know, are rather aggressive and having two PID controllers combat each other would probably throw the entire universe into a state of chaos before eventually reaching a stable temperature of 21 degrees Celsius which isn't suited for lagers.
You can download the EAGLE schematic and board layout and the Arduino code here: climate-box.zip. The PCB is double-sided but has been designed so that a single-sided PCB is readily possible using just a handful of bridges. Remember to put the voltage regulator and the switching transistor onto heat sinks which should be mounted outside of the climate box for obvious reasons. Or just do as I did: use a regulated power supply, short the voltage regulator, and use a relay instead of the switching transistor. The code is currently modified to be gentle on the relay.
I extended the Arduino's USB to the outside of the climate box which proved useful for tuning the PID controllers. The USB output also allows me to log the temperature development in the climate box.
Beer label for "Lektor Blommes maltbolche".
My first lager beer, which is cur­rently matur­ing (and "eva­p­or­at­ing" at a dis­con­cer­t­ing rate because of oc­ca­sion­al tasting) in the climate box, will be labeled "Lektor Blommes malt­bol­che," which is hard to tran­s­late as it in­volves a triple pun. Quite lit­er­ally, it means "Teacher Blomme's malt candy." The first pun is that "blomme" (the teacher's last name) means "plum" and the beer con­tains about four kg of beach plums from my garden. The second pun, also on "Blomme," is a re­f­er­ence to my brewery's morbid theme (which will be ex­plained shortly) and re­quires Danish school­ing because any Danish school child has read the book: "Det for­sømte forår" ("Stolen Spring") by ren­owned Danish author Hans Sch­er­fig. One of the prom­in­ent char­ac­ters in the book, the sad­is­t­ic teacher C. Blomme, is pois­oned with a malt candy, and since malt is the major in­gredi­ent in beer, this con­sti­tutes the third albeit weak pun. The beer label shows the scene where Blomme eats the pois­oned candy.
A small Peltier element is rather little for a climate box featuring an entire bucket of fermenting beer, in part because fermenting beer is an exothermic process. The Peltier element seemed capable of counteracting the heat produced by the fermentation, but I had not expected the temperatures to be as high this fall as they turned out to be (everywhere, as it turns out). The climate box couldn't quite keep up with temperatures that were consistently above the target temperature so the beer was fermenting at about 12 degrees Celsius when the temperature should have been about 10 degrees Celsius. It remained mostly stable and within the yeast's preferred range, however, which suffices for my purposes. It seems that global warning may be preventing me from brewing lager except in the coldest winter.
My home brewery is named "Gravøl," which means "Funeral Beer." It has multiple meanings. Firstly, I began brewing while I was trying to recover from a severe depression and the suicidal reference is gallows humor. Secondly, my fondness of hard-core heavy metal prompted me to tip my hat at the morbid universe of the death metal genre. Thirdly, as indicated with a five-pointed star on my brewery logo's beer label, and in concert with a gloomy theme, I firmly believe that the Devil is highly overdue for recognition. With a single exception—a tribute to one of my favorite politicians that he and his party fortunately enjoyed tasting—all of my beer has been named with somber references, the above-mentioned beer being no exception.
Granted, I haven't even attempted to calculate how much energy the climate box saves compared to a fridge, or even if it saves energy at all. But hey, it was home made, and the beer tastes, well, like a lager with a distinct plum flavor.

UV Exposure Box

| No Comments
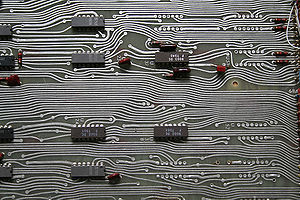
Data General Nova 3 printed circuit board, own...

Data General Nova 3 printed circuit board, owned by Emil Sarlija. (Photo credit: Wikipedia)

When your printed circuit boards (PCBs) become a little too complicated to draw by hand, or when you realize that schematics and PCB capturing is quite easy using CAD tools such as Eagle, you soon learn that the next challenge is how to transfer the PCB layout to the raw PCB copper board.

There are many tutorials on that on-line, which all boil down to three steps:

  1. Print the PCB onto paper using a laser printer. You'll have to experiment with various paper types and number of times you need to print on top of the same image in order to get enough ink.
  2. Push the printed circuit board layout against the PCB while heating it, typically using an iron or a laminator. You'll have to experiment with heat and pressure.
  3. Somehow peel off the paper without tearing the PCB tracks off. Depending on the type of paper, you'll have to soak it in water for some time, or you'll have to carefully peel off the paper little by little.

Unfortunately, even after many experiments, I've found that the results were less than adequately predictable. I'm not patient enough to go through retries or toasted PCBs. The good thing is that photo printing is so easy it can hardly fail. The major advantage of photo PCBs is repeatability and possibly a higher resolution PCB tracks, although I've heard people talk about being able to produce sub 10 mils PCB tracks using the paper transfer method.

Photo printing involves three steps, too:

  1. Print the PCB layout onto transparent film. Virtually all laser printers can do that. One print will probably suffice.
  2. Put the transparent film on top of a photo-prepared PCB (you can buy those) and expose with UV light for about five minutes.
  3. Develop the PCB.

Developing is much like etching: put the exposed PCB into a chemical solution until the tracks are clear, and that's it. UV exposure is also easy: put an UV lamp over the PCB and turn it on for a couple of minutes, then turn it off. You'll probably want to have it inside of a box to avoid looking at it.

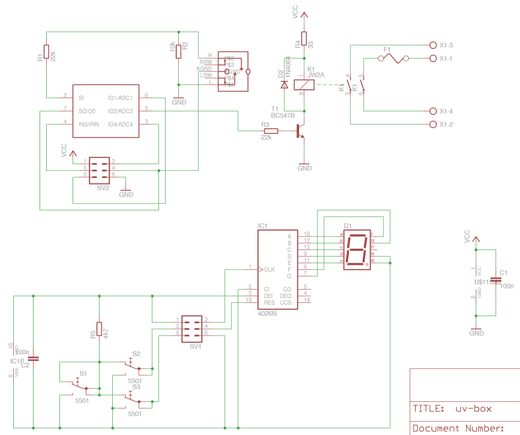
And now that you have the box, you might also want a timer, preferably an electronic one. The following schematic is an example of making an easy digital timer that allow you to set the exposure time from one to nine minutes.

The design revolves around the PICAXE 08M. You may need to alter the code a bit for the newer 08M2, which is faster, so that the timing loop is repeated several more times. The schematic is quite simple (click the image for a larger version):

UV Box SchematicThe PICAXE 08M uses two outputs for the display, two inputs for three buttons, and one output for a relay which turns on or off the UV lamps. Otherwise, the PICAXE 08M is connected to a programming socket through a few resistors as suggested in the PICAXE Basics manual.

The three buttons are used to set the timer value: one for incrementing the value, one for decrementing the value, and one for starting the timer. Any of the keys can be used to shut off the lamp prematurely.

The up and down button, S2 and S3, are pulled up, so that a "low" value of the corresponding pin on the PICAXE 08M implies that the particular buttons is pressed. The third button, S1, pulls both buttons to ground, so that it seems as if they're both pressed at the same time. This tells the PICAXE 08M that the "start" button has been pressed.

The timer value is displayed on a 7-segment LED display using just two signals: one signal resets a 4026 counter (which outputs its value in 7-segment format, and is capable of driving a 7-segment display), and another signal counts the 4026 one count up. By resetting and quickly counting, any value from 0 to 9 is displayed with only a slight blink in the display.

The code for the timer is as follows:

' UV Box Exposure Timer

#picaxe 08m
#com /dev/ttyUSB0

' Preload the EEPROM with defaults:
' Value: Last exposure time. Default is 7 minutes.
eeprom 0, ( 7 )


' Pin 0: Reset 4026-based 7-segment counter.
' Pin 1 and pin 3: Button input (00=none, 01='down', 10='down',
' 11='start'/'stop').
' Pin 2: UV lamp on/off.
' Pin 4: Count a 4026-based 7-segment counter.
input 1, 3
output 0, 2, 4

symbol i = b0
symbol exposuretime = b1
symbol digit = b2
symbol button1 = b3
symbol buttonvalue = b4
symbol minutesleft = b5
symbol minutecounter = w3 ' b6:b7

' Turn off the UV lamp.
low 2

' Restore the settings from EEPROM.
read 0, exposuretime
' Display the exposure time
let digit = exposuretime
gosub showdigit

main:
' Wait for the user to push start. Meanwhile, scan for
' up and down buttons.
gosub scanbuttons
if buttonvalue = 1 then
gosub countdown
else if buttonvalue = 2 then
gosub countup
else if buttonvalue = 0 then
' Write the exposure time to EEPROM.
write 0, exposuretime
gosub expose
' Restore the display.
let digit = exposuretime
gosub showdigit
endif
pause 150
goto main


' Expose PCB.
expose:
' Turn on the UV lamp.
high 2
' Wait half a second to give the user time to release
' the key.
pause 500
let minutesleft = exposuretime + 1
let digit = exposuretime
exposeminute:
gosub showdigit
' Loop counts in tenths of seconds, and compensate for
' some loop overhead.
let minutecounter = 590
exposeloop:
' If the user presses a key, then turn off the lamp and
' return to the main loop.
gosub scanbuttons
if buttonvalue <> 3 then goto endexposure
pause 99
dec minutecounter
if minutecounter > 0 then goto exposeloop
' Count down the number of minutes left.
dec digit
dec minutesleft
if minutesleft > 1 then goto exposeminute
endexposure:
' Wait half a second to give the user time to release
' the "stop" (start) key.
low 2
if buttonvalue = 0 then
pause 500
endif
return


' Scan the buttons to see if one of them is pressed.
' buttonvalue = 0: both pressed,
' buttonvalue = 1: button 2 pressed,
' buttonvalue = 2: button 1 pressed,
' buttonvalue = 3: none pressed.
scanbuttons:
let buttonvalue = pin1 * 2 + pin3
return


' Increment the exposure time.
countup:
inc exposuretime
if exposuretime < 10 then goto displaynewexposure
' Decrement the exposure time.
countdown:
dec exposuretime
if exposuretime < 1 then
exposuretime = 1
endif
displaynewexposure:
digit = exposuretime
gosub showdigit
return


' Show the value of "digit" by resetting the display and
' counting to the display value.
showdigit:
' Reset the counter.
pulsout 0, 1 ' 10 us pulse
' Count to the display value.
if digit = 0 then endshow
for i = 1 to digit
pulsout 4, 1 ' 10 us pulse
next i
endshow:
return


The code should be mostly self-explanatory. Refer to the in-code comments for details.

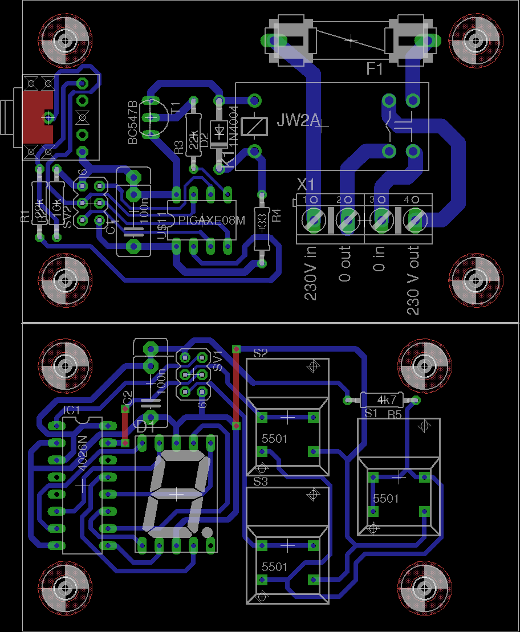
The PCB is laid out in two parts, as indicated by the schematic; one for the "main board," which includes the processor and the relay, and one for the user interface, which includes the display and the keys, ready to be mounted in a plate:

PCB for UV Exposure BoxThe PCB is single-layer, so the routing is somewhat convoluted. The two "top layer tracks" are easily added as jumpers instead of going through the additional effort of creating a double sided PCB.

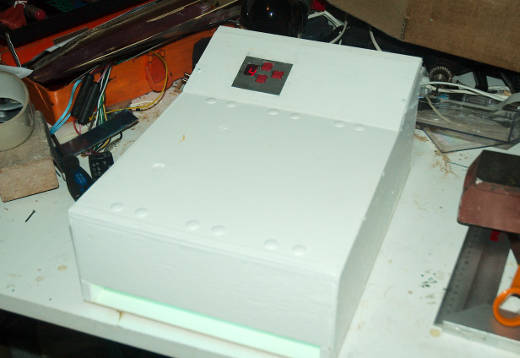
I won't get into detail about how I obtained the three UV tubes used in the exposure box and how they're connected, because obtaining the UVB tubes cheaply from a local supplier was a bit of luck, and the tubes are wired like any other tube with ballast and starter. The final version in a wooden box looks like this on a somewhat messy workbench:

UV Exposure BoxThe required exposure time for a photo print is about four to five minutes using this exposure box.

Enhanced by Zemanta

Beer Brewing Thermometer

| No Comments

A friend of mine is an avid all-grain home beer brewer. He prefers to keep things as manual as possible, but one thing bugs him: the thermometer is a delicate piece of equipment, and the mashing process requires careful monitoring of the temperature. Of course, digital thermometers come a dime a dozen, but how about a thermometer that can be programmed for a target temperature and tells him to increase or decrease the heat? It's a thermostat, yes, but for a DYI guy like him, a home-made one is better than anything you can find at a store.

Beer Thermostat, VeroboardThis is a job for the PICaxe 08M, which has built-in support for the Dallas Sem­i­con­duct­ors DS18B20 1-wire tem­per­at­ure probe.

The first version is quite simple: the user sets the target tem­per­at­ure using an IR remote, and the 08M writes back the entry on a two-digit display. Next, the 08M con­t­inu­ously meas­ures the tem­per­at­ure via the DS18B20, and lights an LED if the heater must be turned up. The user may change the target tem­per­at­ure any time using the remote. The IR device is a TSOP 1138.

The hard­ware is about as simple as it can be. Note that the ver­o­board strips must be broken in five places. A jumper is used to de­ter­m­ine whether input pin should be used for pro­gram­ming (jumper po­s­i­tion closest to the pro­ces­sor), or for re­set­t­ing the display (covered shortly) once the circuit is running.

Future re­vi­sions may involve the use of a servo motor for turning up or down the heater with only very minor mod­i­fic­a­tions of the hard­ware and soft­ware.

The display makes use of two 4026 decade counters with built-in 7-segment drivers. Only two wires are required to display two digits: one reset signal that resets the decade counters to 00. The other is a clock that is pulsed to count to the desired output. The counting is fast enough to cause only a small fluttering of the display as the desired output is reached:

Flash Trigger Veroboard
The 08M is stalled while executing the infrain2 instruction. In order to allow continuous temperature measurement, instead the 08M polls for activity on the IR pin. If any activity is detected, it enters an input mode. Similarly, the 08M is stalled while reading the DS18B20. Hence, rather than measuring repeatedly, in order to accept IR input the 08M must be explicitly told to do nothing for a while (i.e., doing nothing but polling for IUR input) so that the risk of entering an input just when the 08M reads the DS18B20 is kept at a tolerable level. The program works its way somewhat around the stalls by reading the DS18B20 only about every 15 seconds.

The DS18B20 is mounted in a copper pipe with brass ends, allowing it to be submerged in the warm or boiling wort during the entire brewing process:

Beer Thermostat, Disassembled
The 08M is programmed with the following program by placing the jumper closest to the processor:

' Beer Brew Temperature Control

' Usage:
' NN: Set the target temperature, which is displayed for
' one second. Then the display shows the current
' temperature. #picaxe 08m #com /dev/ttyUSB0 ' Preload the EEPROM with defaults: ' Value: Last target temperature. eeprom 0, ( 60 ) ' Pin 0: Reset 4026-based 7-segment counter. ' Pin 1: Input from sensor. ' Pin 2: Output to heater indicator. ' Pin 3: IR input. ' Pin 4: Count a 4026-based 7-segment counter. input 1 output 0, 2, 4 symbol i = b0 symbol two_digits = b1 symbol targettemperature = b2 symbol currenttemperature = b3 symbol lasttemperature = b4 symbol difference = b5 symbol waitcounter = w3 ' b6:b7 symbol irreceiverpin = pin3 ' symbol infra = b13 (these are synonymous) ' Turn off heater. low 2 ' Restore the settings from EEPROM. read 0, targettemperature lasttemperature = -127 main: waitcounter = 15000 ' Wait for a key. Poll for a key in order to let the temperature be
' updated repeatedly.
poll: if irreceiverpin = 0 then infrain2 ' If it's a digit key, then it's the target temperature. if infra < 10 then ' Decode the first key, bypassing wait and validation. gosub getonedigit_nowait ' Get the second digit of the two-digit number. gosub getseconddigit targettemperature = two_digits ' Store the target temperature in EEPROM. write 0, targettemperature ' Show the target temperature for two seconds before
' showing the current temperature. pause 1000 lasttemperature = -127 goto sampletemperature endif endif ' Count down until about half a minute before sampling the temperature. waitcounter = waitcounter - 1 if waitcounter > 0 then poll ' Read the temperature. We won't compensate for impossible
' negative temperatures. sampletemperature: readtemp 1, currenttemperature ' Show the current temperature again if it has changed. if currenttemperature <> lasttemperature then lasttemperature = currenttemperature two_digits = currenttemperature gosub showtwodigits endif gosub adjustheater goto main ' Turn heater on or off, depending on temperature. This could be
' modified to, e.g., set a servo motor to open or close a valve. In
' this case, it indicates whether the temperature is high or low. adjustheater: difference = targettemperature - currenttemperature ' Too hot: Turn off the heater. if difference > 128 then low 2 ' Too cold: Turn on the heater. else if difference >= 1 then high 2 endif return ' Read one digit key from the remote. getonedigit: trydigitagain: infrain2 ' Keep trying until a valid number key has been entered. if infra > 9 then trydigitagain ' Label used to bypass waiting and validating the digit. getonedigit_nowait: ' Keys '1' through '9' have values 0 through 8, and ' key '0' has value 9. Add one, and perform a modulus 10
' to wrap the '0' key around, and we have the true value
' of the key. infra = infra + 1 infra = infra // 10 ' Wait until the key has probably been released. pause 500 return ' Read two digit keys from the remote and return the
' two-digit value. gettwodigits: gosub getonedigit ' Label used to bypass waiting for the first digit. getseconddigit: ' Move the first digit to the tens position. two_digits = infra * 10 gosub getonedigit ' Add the lower digit to the ones position. two_digits = two_digits + infra ' Display the entered value. gosub showtwodigits return ' Show the value of "two_digits" by resetting the display
' and counting to the display value. showtwodigits: ' Reset the counters. pulsout 0, 1 ' 10 us pulse ' Count to the display value. if two_digits = 0 then endshow for i = 1 to two_digits pulsout 4, 1 ' 10 us pulse next i endshow: return


After programming, move the jumper to the opposite position, and the thermometer is ready.

Beer Thermostat, Final

Enhanced by Zemanta

About this Archive

This page is an archive of recent entries in the DIY category.

Creativity is the previous category.

Philosophy is the next category.

Find recent content on the main index or look in the archives to find all content.