


There are plenty of do-it-yourself ring flash projects around, either sporting any number of white LEDs, or foil-clad tube constructions directing the light from a flash to a ring around the lens. However, state of the art LEDs still produce rather little light, and there's a flexible and perhaps even more efficient alternative to transporting light via a tube fitted with reflective walls: optical fibers.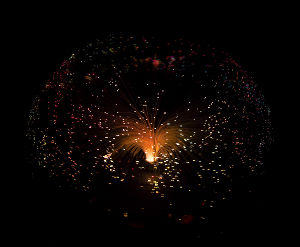 Optical fibers are specifically made to transport light, so my idea was to construct a ring light based on the same principle as the popular optical fiber lamp: a large number of optical fibers are collected at the light source, leaving the other ends fanning out in a spherical shape. For flash purposes, this light source is of course a regular flash unit, and the other ends of the fiber optics cables are fitted in the circular outline of the ring flash, that is, where other DIY people have placed LEDs. Unlike LED constructions, however, this construction allows the camera to adjust its flash intensity automatically, and it doesn't require a power supply. Also, with a large number of fibers, the light should be very evenly distributed, possibly eliminating the need for a diffuser.
It turned out it was difficult to find suppliers of fiber optical cables in my country. The only supplier I found agreed to cut 150 pieces of fibers (length about 50 cm, ø 1,0 mm each) for me and melt together all the fibers in one end. 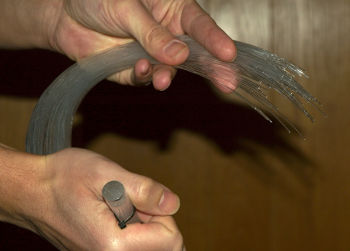 My reliance on the supplier probably makes my particular solution rather costly compared to what may be expected in other countries. However, it's not necessary to melt the ends together (it simply allows the fibers to absorb more light, yielding a better output), so cutting and bundling the fibers is something anyone can do without professional help. The optical fibers themselves don't seem to be expensive at all.
I tested the light conducting capability of the fiber optics whip by holding the glued end in front of my camera's built-in flash unit and looking at the free ends while firing the flash. Don't do this at home: it worked much better than I had hoped, and was practically the same as looking straight into a flash at close range.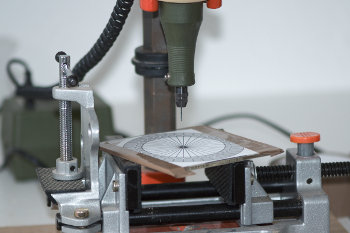 The next part was to construct the ring where the optical fiber ends are attached. I cut the ring from a piece of acrylic glass (you may of course also use wood, cardboard, plastic, or metal) with 150 ø 1,2 mm holes drilled in a uniform pattern. The holes are organized in concentric circles with 36, 37, 38, and 39 holes and slightly rotated to distribute the fiber cable ends as evenly as possible. I used Inkscape to draw a template for the ring. You may download the template here. I created four templates (one for each circle) instead of plotting all holes into a single template, because otherwise the paper would probably crumble before I was even halfway through drilling. I also waited to saw the inner circle and the outline in the acrylic glass until I had drilled all the holes. The uneven edges of the cut were easily smoothed by sanding the plastic.
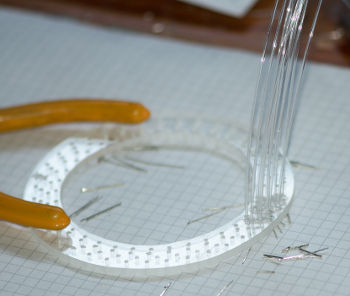 Next, I inserted all the fiber optic cable ends in the holes and fastened them with superglue. I did this in several rounds to allow the superglue to dry before working on the next bundle of cables. I also fitted the acrylic glass ring with a ring of cardboard so that could it slide snugly onto the lens.
For the other end of the fiber optics cable whip, I created a fixture for the camera's built-in flash by cutting and gluing a small fixture of cardboard that could slide onto the flash in one end and onto the fiber optics whip in the other end, and covered it with aluminum foil inside.
With all fibers and the inner cardboard ring attached (including an unexpected 151st fiber that also happened to be too short and was left dangling) the ring conducts light from a regular desk lamp just nicely: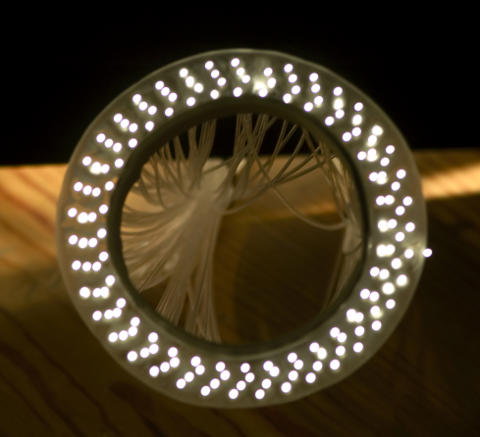 I used cable strips to bundle the fiber cables together in order to ease its fitting onto the lens. In the end, "The Ram" hardly hardly improves the looks of the camera, but that was kind of an expected trade-off:
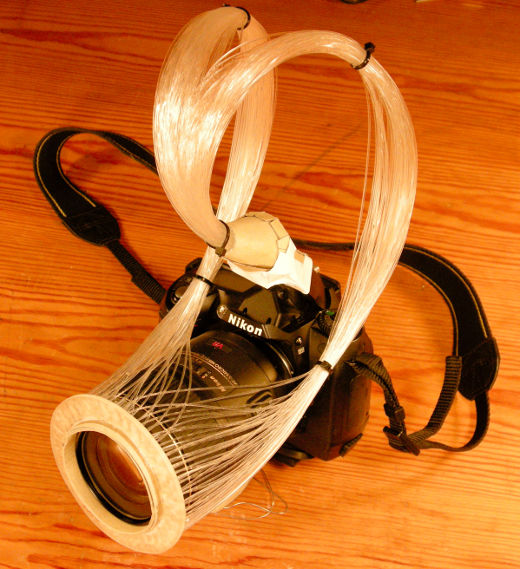
In practice, the ring and the fibers block some of the measuring light and probably cause a slight miscalculation of the target flash intensity. However, the resulting light is reasonably well dispersed as illustrated by this snapshot of a nearby cactus flower:
There's probably room for some improvement in the link between the whip and the flash, but all in all I think this experiment illustrates that fiber optic cables can be successfully applied as a ring flash.
DIY Ring Flash with a 150-Element Optical Fiber Whip
13 Comments
Leave a comment

This is awesome, specially because you where going the same route as I tried to go.
In my country it's very difficult to finde optic fiber as well (for ilumination, not data transfer). But I managed to find someone who had some and they actually gave me some for free.
The thing is, it was cut with scissors and I didn't have the glued end.
After trying unsuccessfully to make it work I decided the problem was that all the strands were actually BROKEN on their ends (cut with scissors actually broke them, not so much as smoothly cut them, since they're a type of glass) and so the angles at the end of each strand where jagged and facing different ways.
Thus, the light transmitted from the flash was weak and very diffused :(
Do you know of any way I could be able to glue and smooth those ends and cut the fiber getting an even smooth cut for the lose ends of the strands (away from the flash).
Or maybe the people you worked this with could ship it?
Anyway, right now I have about a couple of meters of optic fiber that I can't use and I ended up looking for other solutions for my macro lighting
You can find my email at my website www.oscarblanco.net
I would appreciate any suggestions, advice or feedback.
Great job on your experiment!
As long as the cable ends are only somewhat jagged and don't reflect the light backwards or to the sides, some imperfections on the cable ends may even improve the dispersive effect. However, it sounds like your cables are too jagged and throw the light back into the cable or outward into nowhere.
Here's what I did: when I inserted the cable ends in the acrylic glass fixture, many of them extended a few millimeters outside of the fixture, and most of them were pretty unevenly cut. After glueing them to the fixture, I sanded them all down so none of them stuck out.
If you don't have proper scissors, maybe your best bet is to drill the holes as described in the blog entry, then put the cables into the holes and cut them far enough from the fixture so you're sure they aren't broken or jagged near the fixture. Then carefully sand them down (it's plastics, so it won't take but a few minutes) until they align with the fixture.
I think the keyword is sanding. I used a somewhat high grain size in the ring flash end where high dispersion is a good thing, but if you can't melt the ends together in the flash end you may want to use a low grain size. I suspect a heat gun may provide enough heat to melt the ends (you could perhaps hold them against a metal plate with the heat gun on the other side of the metal plate), but that's just speculation.
Hi!
Found you through petapixel and a friend told me that the photo of your camera has been featured on Reddit.
Thought you might want to know that =)
Very cool idea and I'd love to see a portrait with the ring flash, I'd love to see the effect of 150 fibres in a ring in the eyes of a person.
I'm curious if they look like small dots or if they show up as one big ring of light.
Again, love the build!
Thanks. Reddit seems to have caused around 18,000 page visits at the moment.
Ring flashes are primarily useful for macro photography, not for portraits. Of course, I could take a close-up of an eye, but the person probably wouldn't appreciate the full brunt of the flash a few inches away from his or her eyes. I'd probably settle for a custom bokeh for that.
I'm sure the lights are going to show up as neither dots nor a ring, but simply as a single light.
Thanks for your feedback. You're right! Sanding must be the answer!
I'm thinking I can use silicon glue and just dip the ends into it, then rap them up in tape, let them dry, and then sand :)
I think the heat gun might not be the answer, because you could end up with deformed, twisted and engrossed ends, maybe even blackened. Plastic doesn't love heat :D
I'm pretty sure the heat gun won't kill the fibers. While it's hard to recognize from the picture, the fibers are melted together so you can hardly tell one fiber from the other. As I understand it, the idea is to eliminate the spaces between the fibers in the light source end so that the light doesn't escape inbetween the fibers. To be honest, I'm not even sure whether this is an advantage: the space is eliminated, but the melting process might actually change the structure of the fiber optics cables, damaging their light transmission characteristics.
Whenever I have wire melting accidents with my heat gun while trying to shrink heat-shrinkable tubing, the plastic insulation on the electrical wires usually just melts and never get burned. I'm sure the optical fibers may even be rather heat resistant, so I wouldn't think twice trying the heat gun or even a gas burner. The reason I thought of a metal plate is that you probably want the fibers to have a somewhat even end; also, the metal plate would provide a single point of heat that the fibers could be melted against.
How many wires did you use to create this ?
I'm not sure, but with four concentric rings and about 40 "sections," it's probably 150 wires.
Or, rather, about 100 wires, because the inner circles contain fewer ends.
I thought so. Why did you choose 1mm wire - in your opinion is this approach better than i.e. 2mm ?
I don't quite remember. It may have been cost, or possibly a decision that the wire should be be somewhat flexible.
Hey there would you mind letting me know which hosting company you're using? I've loaded your blog in 3 different web browsers and I must say this blog loads a lot quicker then most. Can you suggest a good hosting provider at a reasonable price? Kudos, I appreciate it!
I'm using Bluehost.com as a hosting company.
However, I suspect the reason for the low load times has to do with the blogging software rather than the hosting company. The blog is generated with Movable Type, which creates static pages; that is, unlike Wordpress it creates HTML pages that don't need to be generated on each load.