The Dallas 1-wire protocol makes it possible to attach a variety of devices ranging from counters, temperature sensors, memory, and humidity sensors, onto just a single data wire. Several of the sensors require no supply voltage line; instead, they draw the supply voltage from the data wire in so-called "parasitic" mode. The communication protocol allows a short burst of current on the data line that charges an internal capacitor in each of the attached 1-wire devices. Once charged, the internal capacitors provide just enough current to allow the 1-wire devices to do their thing and respond on the data wire.
A 1-wire controller is necessary, and while it is relatively easy to build a serial version with only a few components, Hobby Boards sells a USB adapter that is compatible with Ubuntu Linux.
Each device has a unique ID that is queried by the controller. Only those devices whose ID matches the controller's request are allowed to respond on the data line. Hence, all 1-wire devices are simply attached in parallel on the data wire, limiting the total wire count to two wires (one for data, one for ground). Some 1-wire devices that require large amounts of currents, such as LCD devices, require their own supply voltage, however. This may increase the wire count to three if you want to power all of these devices from a shared power supply, but you may also choose to power the 1-wire devices separately. The temperature sensors don't require a power supply unless you're using poor wire types, long wires, or have attached a large number of sensors on the same wire.
With Ubuntu, temperature logging requires only one Dallas one 1-wire controller, as many 1-wire temperature sensors as you want, and some scripting skills. Hobby Boards sells 1-wire sensors, too, which readily fit into their USB adapter. However, I chose to purchase a handful of bare DS18B20 temperature sensors from a local electronics outlet instead. I also needed an RJ45 connector for the USB adapter, which appears to be Hobby Boards' preferred connector. I was a little surprised to learn that Hobby Boards had chosen the black wire for data and red one for data/power.
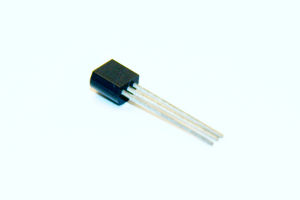
 The 18B20 device comes in a TO92 housing. The outermost pins are ground and power supply. When shorted, they indicate parasitic mode where the 18B20 draws power from the data pin in the middle. So, from the USB adapter, ground goes to the outer pins on the 18B20, and data goes to the middle pin. Of course, I built the 18B20 devices into small cases with adapters on them, enabling them to easily be connected in parallel with other cases containing 18B20 devices. For outdoor use, I enclosed the device and the cables in an epoxy-filled case to shield it from moisture.
Next, the software. The Ubuntu Linux kernel already includes 1-wire support, and the only required external software was "digitemp," which is found in the Ubuntu software repositories. I originally installed it on Ubuntu 9.10 where I had to blacklist the DS2940 kernel module. A file named "/etc/modprobe.d/blacklist-ds2940.conf" with the following contents takes care of that:
# To get digitemp to work
blacklist ds2940
It may not be required on current Ubuntu releases, but it probably doesn't hurt.
Plug in the USB adapter, and Ubuntu loads the proper kernel; you can see in /var/log/messages what happens when the adapter is plugged in.
The next step is to determine the unique IDs of the attached 18B20 sensors. Digitemp can be used to send a broadcast query that returns the IDs as follows:
You may need to "sudo" the command. For some reason, this currently doesn't output anything on my own server, but back when I originally queried the IDs, it yielded an output similar to the following:
# digitemp_DS2490 -w
DigiTemp v3.5.0 Copyright 1996-2007 by Brian C. Lane
GNU Public License v2.0 - http://www.digitemp.com
Found DS2490 device #1 at 003/005
Turning off all DS2409 Couplers
...
Devices on the Main LAN
28913B56020000F2 : DS18B20 Temperature Sensor
282221560200006D : DS18B20 Temperature Sensor
(etc.)
You'll have to figure out on your own which device ID (the string to the left in the list that is output) belongs to which sensor. These IDs are required to query the proper device, and must be copied to a configuration file. I called my configuration file "/root/digitemp.conf", and it contains the following:
READ_TIME 2000
LOG_TYPE 1
LOG_FORMAT "%Y-%m-%d %H:%M:%S Sensor %s C: %.2C F: %.2F"
CNT_FORMAT "%Y-%m-%d %H:%M:%S Sensor %s #%n %C"
HUM_FORMAT "%Y-%m-%d %H:%M:%S Sensor %s C: %.2C F: %.2F H: %h%%"
SENSORS 5
# Server Room
ROM 0 0x28 0x91 0x3B 0x56 0x02 0x00 0x00 0xF2
# Home Office
ROM 1 0x28 0xFC 0x63 0x56 0x02 0x00 0x00 0xD0
# Heater
ROM 2 0x28 0x22 0x21 0x56 0x02 0x00 0x00 0x6D
# Outside, East
ROM 3 0x28 0x5E 0x17 0x56 0x02 0x00 0x00 0x90
# Living room
ROM 4 0x28 0x1F 0x3A 0x56 0x02 0x00 0x00 0xC6
The ROM codes are your choice of device numbers and the IDs that were output by the previous broadcast query.
Finally, the script that queries the temperatures of the 1-wire sensors is a simple Bash script stored in the /root folder:
#!/bin/bash

DIGITEMP_CMD=/usr/bin/digitemp_DS2490
CONFFILE=/root/digitemp.conf
STATEFILE=/var/lib/temperature/current
TMPFILE=/tmp/digitemp.XXX

# Abort after first script error.
set -e

# Get a unique temporary tamper-proof file name.
tmp=$(mktemp $TMPFILE)

# Create a full poll list of the temperature array. This takes up to
# 5 seconds per sensor, and therefore must be done to a (slowly growing)
# temporary file.
$DIGITEMP_CMD -q -c $CONFFILE -a -sUSB -l $tmp

# 'Atomically' move the freshly created state file in place.
chmod 644 $tmp
mv $tmp $STATEFILE
# Insert new measurements into database.
/usr/bin/php /root/digitemp-insert.php
Before calling the script, create a writeable directory in /var/lib/temperature, where the sensor outputs are stored in a file named "current". Call the script every, say, five minutes using a crontab entry:
# Read temperature probes every 5 minutes.
*/5 * * * * /root/digitemp.sh > /dev/null 2>&1
The last line in the script calls another script that inserts the temperatures and time stamps for all temperature sensors into a MySQL database. If you don't need logging but only want the most recent temperature output, simply delete the last line of the script and read the current temperatures from /var/lib/temperature/current. You won't need any of the following either in that case.
The MySQL database insertion script simply reads and parses the file in /var/lib/temperature/current and inserts the values into a previously created MySQL database. The database contains the following tables:
- id (int, autoincrement, primary key)
- sensor (tinyint)
- date (datetime)
- temperature (float)
You'll have to create the MySQL database yourself, for example via phpMyAdmin. Remember to assign a user and a password, too.
The MySQL logging script looks like this, except that my password has been obscured:
<?

// Read the temperature log.
$entries = array( );
$fileHandle = fopen( "/var/lib/temperature/current", "r" );
while( ! feof( $fileHandle ) )
{
    $temperatureLogEntry = fgets( $fileHandle );
    // Break down the string, which looks like this:
    // Jul 20 11:25:21 Sensor 0 C: 24.31 F: 75.76
    $entry   = array( );
    $pattern  = '/';
    // Date and time
    $pattern .= "^([0-9]{4}-[0-9]{2}-[0-9]{2} [0-9]{2}:[0-9]{2}:[0-9]{2})";
    // Sensor number.
    $pattern .= " Sensor ([0-9]{1,3}) ";
    // Sensor temperature.
    $pattern .= "C: (-*[0-9]{1,3}\.[0-9]{1,3}) ";
    $pattern .= "/";
    if( preg_match( $pattern, $temperatureLogEntry, $entry ) )
    {
        $entries[ ] = $entry;
    }
}

fclose( $fileHandle );


$mysqlBase = "temperatur";
$mysqlUser = "temperatur";
$mysqlPass = "*************";

$con = mysql_connect( "localhost", "$mysqlUser", "$mysqlPass" );
if( ! $con )
{
    die( 'Could not connect: ' . mysql_error( ) );
}
mysql_select_db( "$mysqlBase", $con );

foreach( $entries as $entry )
{
    $date        = $entry[ 1 ];
    $sensor      = $entry[ 2 ];
    $temperature = $entry[ 3 ];
    $sensorName  = $sensors[ $sensor ];

    $timestamp = strtotime( $date );
    $query = "INSERT INTO temperatur ( sensor, date, temperature ) "
           . "VALUES( '$sensor', '$date', '$temperature' )";
    $result = mysql_query( $query );
}

mysql_close( $con );

?>
To display the temperature log, a web server comes in handy. There are several graphical plotting options available, and I settled for the free version of JpGraph. I downloaded it from the web site because the version in the Ubuntu repositories seemed rather outdated. I recall I had to specify the directory for TrueType fonts and ensure that JpGraph was in PHP's search path, but otherwise I think it worked straight out of the box.
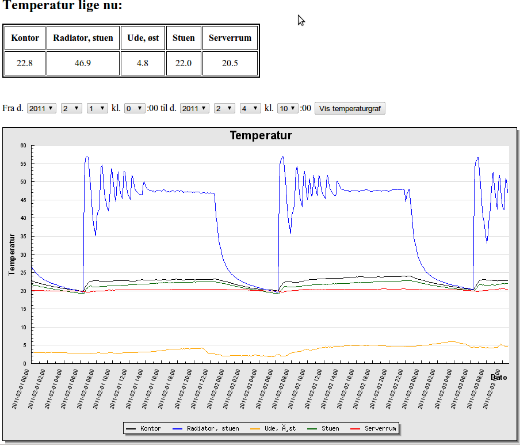
The script that uses JpGraph is called via the "img" HTTP tag. The script compiles image that is embedded into the main graph display script. My graphing script allows the user to enter a plot interval, and is simply the index file, "index.php". Rather than including the PHP scripts here, you may download them as a tarball here: temperature.tar.gz. Install them in a directory together with JpGraph. You'll have to do a few customizations: JpGraph may have to be tweaked a little to make sure it's visible from the scripts; you'll also have to set the database, username, and password in "config.php" according to the MySQL database you created previously; and, you'll want to modify the script to display those sensors that are appropriate for your own setup. Once configured, the script should display an output similar to the following:


 For ca. 15 år siden oplevede Danmark en epoke i mobiltelefoni, hvor Nordjylland for en tid blev kaldt for Europas "Silicon Valley". Adskillige firmaer udviklede mobiltelefoner og software til samme, og ingeniører og udviklere havde nemt ved at finde arbejde til en løn, der nogle steder var ganske udmærket. Glæden varede dog kun kort, og elektronik- og softwareindustrien i Aalborg-området er i dag karakteriseret ved mindre entreprænørvirksomheder.
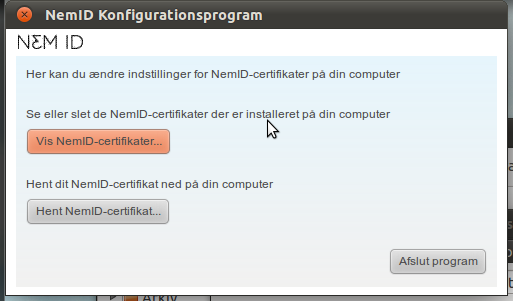
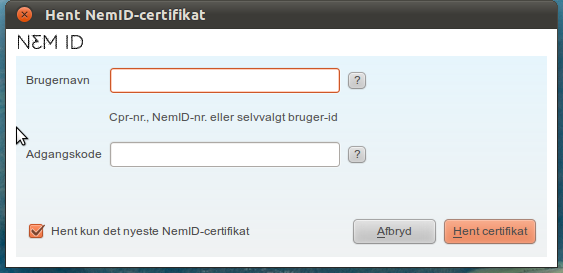
 Klik på "Hent NemID-certifikat". Du får nu følgende vindue, hvor du skriver dit NemID-brugernavn og password:
 Klik på "Hent certifikat", og dit certifikat er installeret.
 The 18B20 device comes in a TO92 housing. The outermost pins are ground and power supply. When shorted, they indicate parasitic mode where the 18B20 draws power from the data pin in the middle. So, from the USB adapter, ground goes to the outer pins on the 18B20, and data goes to the middle pin. Of course, I built the 18B20 devices into small cases with adapters on them, enabling them to easily be connected in parallel with other cases containing 18B20 devices. For outdoor use, I enclosed the device and the cables in an epoxy-filled case to shield it from moisture.
